“It's so perfect for fall, and I'm going to show you guys how to achieve the perfect look without having to bleach or damage your own natural hair.”
She feels like this wig is the best protective style, looks natural. And that wig, which mimics your natural hair texture, is the best option in her opinion. This texture is the kinky straight texture, one of her favorite textures.
And we are doing it this time with a great color, 33B. Dark auburn is so bold and beautiful. Having it, you are ready for fall.
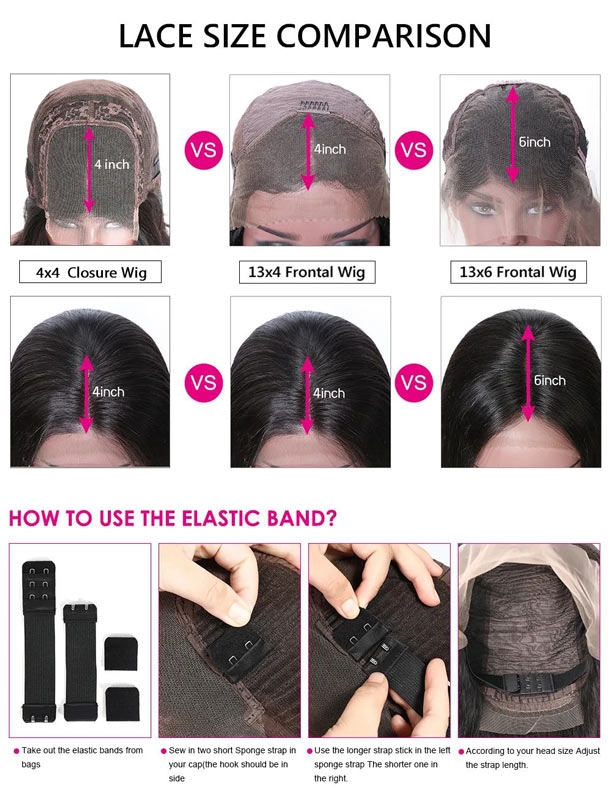
It's a lace front construction, the hairline is done to perfection. She does not have to tweezer it at all because it was done so well. It does come with an elastic band so that it can snug on your head.
Then, she is going to try the wig on so that you all can see what it looks like.

“You do need to customize your wig cap as well as the lace on the wig so that it best matches your skin tone. I'm going to show you guys how to do that in a moment, as you all can observe.”
The wig cap is peeking through the lace, and we don't want that, so we need to alter the color so that it's more seamless.
She uses the Ruby kiss 3D face creator to brush all over the wig cap And then, she cuts the front lace portion off. The lace part is 13×4. It is transparent lace, so you do get four inches of parting space in the middle. On the sides, it is about two inches. Just keep that in mind.
This 13×4 Kinky Straight Lace Front Wigs 33B wig is in 150 density, so it does look very natural and realistic at 22 length and this density.
Right now she shows you all what the transitional space between lace and hair looks like and the roots on this wig did already come bleached so that's a nice plus.
It is the time to tint this lace. She uses a slightly different method. Depending on the color of your skin tone, you may not have to tint the lace at all. “Because my skin tone is on the darker side she decides to start with a darker base first, especially this lace is much lighter than my skin tone, so I started with the wig chocolate darling lace tint first. And then followed it up with the airbrush spray in deep glow, typically. She would only use the air brush spray, but I decided to try both this time around to achieve a more scalp-like appearance.”
Use this one-step hair dryer in order to dry the edges, and also to get the crimps out of the hair from the packaging. It makes doing a blowout so much easier.
This lace really made a difference. “I feel like it looks so much more scalp-like, and I love how flat this lace lies on my hairline. It actually looks like it could be mine.”
Now proceed to melt the lace by using her staple adhesive, which is the got 2b glue in the yellow bottle. It is free to use whatever adhesive you love best. She generally doesn't use wig glue because she feels like it's too damaging. She also removes her wigs nightly.
“This lace is so good and it melted so nicely into my skin. It is looking so good so far, and we're not even finished yet.”
The color looks so fire, isn’t it? “I'm so glad I stepped out of my comfort zone, this color is divine, and this hair feels so soft, and it mimics my natural hair texture so well. I feel like Beautyforever hair did such a great job with this unit.”
So realistic and the kinky straight texture is so on point.
In the end of this tutorial, she hopes you all thoroughly enjoyed it and really love this color as much as she does. It's so great for a fall, after all.

Finally, she shows you all some quick and easy styles that you can do with the wig.
1. Part the hair in the middle of the head, and braid two strands of hair from both sides of the ear. Wrap the braid around the back of the head and secure it on the nape. Then, leave two strands of hair hanging naturally down each side of your cheeks, which balance your facial features and looks gorgeous.
2. Leave out two fine strands in the front of your ears, tie the rest of your hair down at the head back.
Beautyforever hair is having a 6th anniversary sale, so be sure to check the description box and the discount code. Hope you all enjoyed this tutorial and welcome to visit our website. Thousands of pretty and natural wigs are here waiting for you!